Battery switch on travel trailer function is crucial for managing your RV’s power. Understanding how these switches work—whether it’s a simple 1-2-both or a more complex setup—is key to preventing dead batteries and maximizing your off-grid adventures. This guide will walk you through different switch types, proper usage, troubleshooting, and safety tips to keep your travel trailer’s electrical system humming.
We’ll cover everything from identifying your switch type and its internal workings to understanding its interaction with other systems like solar panels and converters. We’ll also tackle common problems and provide solutions to get you back on the road quickly and safely.
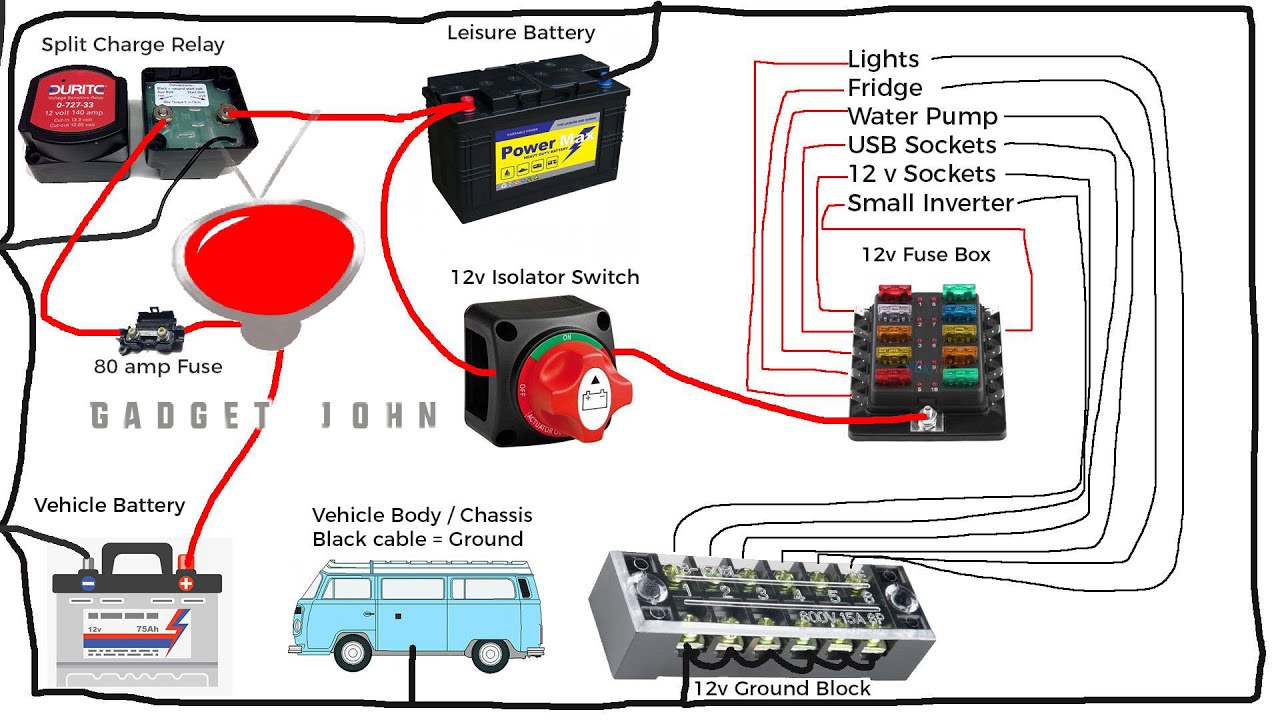
Proper Battery Switch Usage
Understanding your travel trailer’s battery switch is crucial for managing power and extending the life of your batteries. This switch allows you to isolate your house battery (powering interior lights, appliances, etc.) from the chassis battery (powering engine starting). Proper usage prevents accidental drain and ensures you always have power when you need it.Proper switching between your house and chassis batteries involves a simple, yet important procedure.
It’s vital to understand the positions of the switch and what each position does to avoid any issues. Improper use can lead to a dead battery, leaving you stranded.
Battery Switch Operation
The battery switch typically has three positions: “Off,” “Both,” and “House.” The “Off” position completely disconnects both batteries. “Both” connects both the house and chassis batteries, allowing for charging of the house battery from the alternator while driving and maximizing available power. The “House” position connects only the house battery, useful for conserving power when the trailer is not being driven.
Always consult your specific battery switch’s instructions for clarification, as variations exist.
Step-by-Step Battery Switch Use for Power Conservation
To conserve battery power, follow these steps:
- Before disconnecting from shore power or your vehicle, switch the battery switch to the “Both” position to allow the alternator to charge both batteries while driving.
- Once you’ve reached your destination and parked, switch the battery switch to the “House” position to use only the house battery.
- When leaving your trailer unattended for an extended period, switch the battery switch to the “Off” position to completely disconnect both batteries and prevent any parasitic drain.
- Before starting your vehicle, switch the battery switch to the “Both” position or “House” position if you want to leave the house battery connected to the system.
These steps ensure your batteries remain charged while driving and prevent unnecessary drain when parked.
Preventing Accidental House Battery Disconnection
Accidental disconnection of the house battery can be frustrating, especially if you’re relying on it for essential functions. To avoid this, ensure the battery switch is securely in the desired position after each use. Avoid using excessive force when turning the switch and visually check that it is firmly seated. Regularly inspect the switch for any signs of damage or looseness.
If you are concerned about accidental disconnection, consider using a switch with a locking mechanism.
Battery Switch Location
The battery switch is usually located in a readily accessible area near the batteries themselves, often inside a compartment near the tongue of the trailer or within a dedicated electrical bay. You might find it secured to a wall or frame, sometimes behind a panel or door. It’s typically labeled clearly, making it easily identifiable. The location is designed for ease of access so you can quickly switch between battery configurations as needed, but always check your owner’s manual to pinpoint its precise location within your specific trailer model.
So, you’re an audiophile who loves to travel? Awesome! Check out this guide on setting up your audiophile travel setup for the best sound on the go. It’s all about packing light but smart. Then, if you’re hitting the road in an RV, understanding your battery switch on travel trailer function is crucial for powering all your gadgets, including that awesome portable DAC.
Knowing how to manage your power ensures your music never stops, no matter where your adventures take you!
Troubleshooting Battery Switch Issues
Your travel trailer’s battery switch is a critical component, ensuring you have power when you need it. A malfunctioning switch can leave you stranded without lights, refrigeration, or other essential systems. Understanding common problems and troubleshooting steps will help you quickly resolve issues and get back on the road.
Common Battery Switch Problems
Several issues can prevent your battery switch from working correctly. These often stem from neglect or exposure to the elements. Addressing these problems proactively can save you significant headaches down the road.
- Corrosion: Battery terminals and the switch itself are susceptible to corrosion, especially in humid climates. Corrosion buildup creates resistance, hindering the flow of electricity and potentially causing the switch to fail completely. You might notice a white, green, or blue powdery substance around the terminals or switch contacts.
- Loose Connections: Vibrations during travel can loosen connections at the battery terminals or the switch itself. Loose connections create intermittent power or a complete lack of power to your appliances.
- Internal Switch Failure: Over time, the internal components of the battery switch can wear out or become damaged. This is less common but can manifest as a complete lack of power regardless of the switch position.
- Wiring Issues: Problems in the wiring leading to or from the switch can also mimic switch failure. A broken wire or a poorly connected wire can interrupt the circuit.
Troubleshooting a Non-Functional Battery Switch
If your battery switch isn’t working, a systematic approach is key. Start with the simplest checks and work your way to more complex solutions.
- Visual Inspection: Begin by carefully inspecting the battery switch and its connections for any signs of corrosion, loose wires, or physical damage. Look closely at the terminals and the switch itself.
- Check Connections: Tighten any loose connections at the battery terminals and the switch. Ensure that all cables are securely fastened. If corrosion is present, proceed to the cleaning step.
- Clean the Switch and Terminals: Use a wire brush or sandpaper to remove any corrosion from the battery terminals and the switch contacts. A battery terminal cleaner can also be helpful. Apply a dielectric grease to the terminals and connections after cleaning to prevent future corrosion.
- Test the Switch: After cleaning and tightening connections, test the switch by turning it to different positions and checking for power at the appliances. Use a multimeter to verify voltage at the switch and at the appliances if necessary.
- Check Wiring: If the switch still doesn’t work, trace the wiring leading to and from the switch, checking for any breaks or loose connections. You might need a wiring diagram for your specific trailer model.
- Replace the Switch: If all else fails, the battery switch itself might need to be replaced. This is often the most effective solution if you’ve ruled out other problems.
Maintaining Your Battery Switch
Regular maintenance is crucial to prevent problems and extend the lifespan of your battery switch.
A simple visual inspection every few months, checking for corrosion and loose connections, is a good preventative measure. Cleaning the terminals and applying dielectric grease annually or as needed will help maintain a good electrical connection and prevent corrosion. This is especially important in humid environments or areas with harsh winters. By following these simple steps, you can significantly reduce the likelihood of encountering battery switch issues.
So, you’re an audiophile who loves to travel? Awesome! Check out this guide on setting up your audiophile travel setup to ensure you don’t miss out on your favorite tunes on the road. And speaking of road trips, remember to understand your power needs. Knowing the battery switch on travel trailer function is crucial for keeping your devices charged and avoiding dead batteries – especially if you’re using power-hungry audio equipment.
Proper power management is key to a smooth and enjoyable journey.
Troubleshooting Flowchart
This flowchart provides a structured approach to troubleshooting your battery switch.
- Problem: Battery switch not working.
- Step 1: Inspect switch and connections for corrosion or loose wires. If found, proceed to Step 2.
- Step 2: Clean terminals and connections. Tighten any loose connections. If this resolves the issue, perform regular maintenance. If not, proceed to Step 3.
- Step 3: Test switch operation with a multimeter. If no power, check wiring for breaks or poor connections. If this resolves the issue, repair the wiring. If not, proceed to Step 4.
- Step 4: Replace the battery switch.
Battery Switch and Electrical System Integration

Your battery switch is the central nervous system of your travel trailer’s DC power. Understanding how it interacts with other components is key to avoiding electrical problems and maximizing your off-grid capabilities. This section will detail the relationship between your battery switch and other electrical systems in your RV.The position of your battery switch directly impacts the flow of power throughout your travel trailer.
In the “Off” position, all power to the house batteries is cut, preventing discharge. The “Battery” position connects the house batteries to the trailer’s 12V DC system, powering lights, water pumps, and other DC appliances. The “Both” position (if equipped) adds the power from your tow vehicle’s charging system to the house batteries, allowing for charging while driving.
Finally, the “Shore Power” position (often combined with “Both”) allows shore power to power the trailer’s 12V system through the converter and simultaneously charge the batteries.
Battery Switch and Solar Panel Interaction
Solar panels, if installed, typically charge the house batteries directly. The battery switch’s position doesn’t directly control the solar panel’s operation; the panels will continue to charge the batteries regardless of the switch’s position, except when the switch is completely off. However, the switch determines how that stored solar energy is used. In the “Off” position, the solar-charged batteries are isolated.
In other positions, the power generated by the solar panels is available to the trailer’s DC system.
Battery Switch and Converter Interaction, Battery switch on travel trailer function
The converter transforms AC power (from shore power or a generator) into DC power for the 12V system and also charges the house batteries. When the battery switch is in the “Shore Power” or “Both” position, the converter charges the batteries, and the 12V system runs off the converter’s output. With the switch in the “Battery” position, the converter may still charge the batteries (depending on the converter’s design and settings), but the 12V system runs directly from the house batteries.
In the “Off” position, the converter still receives AC power but doesn’t charge the batteries, and the 12V system is completely off.
Appliance Functionality Based on Battery Switch Position
The battery switch dictates which power source feeds your 12V appliances. In the “Off” position, no 12V appliances will function. In the “Battery” position, appliances run directly off the house batteries. In the “Both” or “Shore Power” positions, appliances run primarily from the converter’s output, with the batteries acting as a backup and receiving a charge. This means appliances will function as long as the chosen power source (shore power or generator) is available.
Power Draw Comparison Based on Battery Switch Position
The power draw on the system varies greatly depending on the battery switch position. In the “Off” position, the draw is minimal, only accounting for any parasitic loads. In the “Battery” position, the draw comes directly from the house batteries, meaning the available power is limited to the battery’s capacity. In the “Both” or “Shore Power” positions, the draw is primarily from the AC source (shore power or generator), reducing the strain on the batteries while simultaneously charging them.
The overall system draw will increase with more appliances in use regardless of the switch position.
Simplified Diagram of Electrical System Integration

The Battery Switch: Controls the flow of power to and from the house batteries.
Solar Panels: Charge the house batteries directly, independent of the battery switch (except when off).
Converter: Converts AC power to DC power for the 12V system and charges the house batteries when connected.
House Batteries: Store DC power for the 12V system.
Mastering your travel trailer’s battery switch is about more than just flipping a lever; it’s about understanding your RV’s electrical system and ensuring safe and efficient power management. By following the guidelines and troubleshooting steps Artikeld here, you can confidently navigate the intricacies of your battery switch, preventing costly repairs and enjoying worry-free adventures on the open road. Remember to always prioritize safety and consult a professional if you’re unsure about any aspect of your RV’s electrical system.
Clarifying Questions: Battery Switch On Travel Trailer Function
What happens if I leave my battery switch in the “off” position?
Leaving the switch in the “off” position completely disconnects both your house and chassis batteries, preventing any power from flowing to your appliances or starting your vehicle.
How often should I clean my battery switch?
Inspect and clean your battery switch at least once a year, or more often if you notice corrosion or poor connections. A simple wire brush and baking soda solution can work wonders.
Can I use a battery switch to charge both batteries simultaneously?
Depending on your switch type (1-2-both), yes. However, charging efficiency might vary. Consult your RV’s manual or a professional for optimal charging procedures.
My battery switch is making a clicking sound. What’s wrong?
A clicking sound often indicates a low battery or a problem with the switch itself. Check your battery voltage and inspect the switch for loose connections or corrosion. If the problem persists, consult a professional.
